Replacing your countertops can dramatically change the look and feel of your kitchen or bathroom. Whether you’re opting for luxurious marble countertops, sleek porcelain, or durable granite, accurate measurements are crucial for a smooth and successful installation. Follow this extended guide to measure your countertops like a pro, ensuring a perfect fit every time.
Step 1: Draw a Simple Sketch
The first step in measuring your countertops is to create a visual map of your space. This doesn’t need to be intricate, but it should be clear and to scale.
- Use graph paper or a digital layout tool to sketch your kitchen or bathroom, looking down from above.
- Mark all countertop areas, including islands, bars, corners, and backsplashes. Make sure to label each area clearly to avoid confusion later.
-
Indicate where walls, doors, and windows are, as this will affect how your countertops fit into the space.
This sketch acts as your reference point throughout the measuring process, guiding you and any professionals involved in the project.
Step 2: Mark Cutouts for Sinks and Appliances
If your countertops need cutouts for sinks, stovetops, or other built-in appliances, it’s crucial to account for these when measuring.
- Measure each cutout carefully: Begin by measuring from the outside edge of the cutout (not the center), and record the dimensions on your sketch.
- Note the location of each cutout: For precise measurements, measure from the wall to the center of the cutout.
- Simple shapes for clarity: Represent each cutout with simple shapes (rectangles, squares, or circles) on your sketch, and write down exact measurements to avoid confusion later.
- Be sure to leave extra room around each cutout to account for installation adjustments.
Step 3: Measure the Countertop Dimensions
Now it’s time to measure the actual countertop areas that will be installed.
- Length: Use a tape measure to measure the length of each countertop surface. For countertops that run along walls, measure from one end to the other. If appliances separate sections of the counter, measure each section separately and then combine the lengths.
- Width: Measure the width from the wall to the edge of the countertop. For overhanging counters, make sure to account for the extra length.
- Depth: If your countertops are not a standard depth, measure from the wall to the farthest point of the countertop to ensure that you order enough material.
Step 4: Include Overhangs
Overhangs are the portions of the countertop that extend beyond the edge of the cabinet or base. If your design includes overhangs—whether for seating areas, breakfast bars, or aesthetic appeal—you need to measure them accurately.
- Measure the overhang: Typically, overhangs extend 1 to 2 inches, but this can vary depending on your preferences and design.
- Account for extra material: Overhangs add to the total square footage, so make sure to include them in your measurements to avoid ordering too little material.
- Consider additional features: If the overhang includes curved or unusual shapes (like a circular breakfast bar), be sure to account for the full contour.
Step 5: Measure the Backsplash
If you’re including a backsplash along your countertops, measuring this area correctly is important for both material and design purposes.
- Height of the backsplash: Measure from the top of the countertop to the height you want the backsplash to reach, whether it’s a standard 4-inch height or a taller design.
- Length of the backsplash: Measure each section of the backsplash carefully. This includes any areas behind sinks, stoves, or other appliances, and ensures the backsplash fits snugly with your countertop.
- Account for special designs: If you’re planning intricate tile work or a unique backsplash design, make sure you measure each section of the wall to ensure the right amount of material.
Step 6: Calculate the Total Square Footage
Now that you have all your dimensions, it’s time to calculate how much material you’ll need.
- Calculate the area for each section: Multiply the length by the width for each rectangular section of your countertop. This will give you the area in square inches.
- Convert to square feet: Divide the total square inches by 144 to convert it to square feet. For example, a 50-inch by 25-inch section is 1,250 square inches. Divide this by 144 to get 8.68 square feet.
- Add all sections together: For multiple countertop sections, sum the square footage of each to find the total area.
- Consider extra material: It’s always wise to order 5–10% more material than your exact measurements to account for mistakes, cuts, and installation adjustments.
Step 7: Share Your Measurements with Professionals
Once you’ve carefully measured your countertops, share the detailed measurements and sketch with a professional installer or countertop supplier.
- Professional assessment: A pro can help confirm that your measurements are correct and will provide a more accurate final quote.
- Digital templates: Many installers can take your measurements and create precise templates or digital models, reducing the risk of errors.
- Be clear about your preferences: Along with measurements, share your design preferences (e.g., edge styles, finishes) to ensure the installation process aligns with your vision.
Tips for Choosing the Perfect Countertops
Selecting the right material is just as important as taking accurate measurements. Here are some popular choices and their benefits:
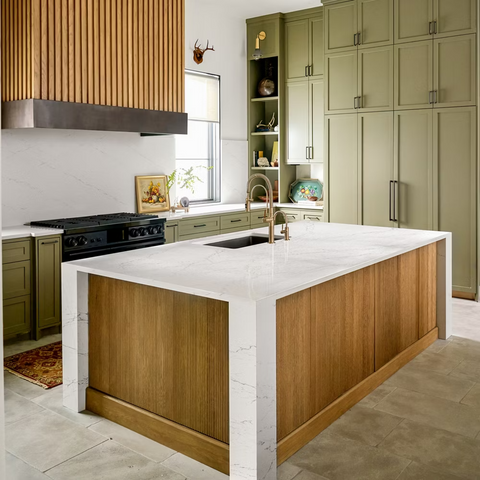
- Marble Countertops: Timelessly elegant, marble adds a classic beauty to any space. It’s perfect for kitchens and bathrooms but requires some maintenance due to its porous nature.
- Porcelain Countertops: Durable and non-porous, porcelain is heat and scratch-resistant, making it ideal for modern kitchens. Available in many sleek, contemporary designs.
- Granite Countertops: Known for their strength and natural beauty, granite is highly durable and resistant to heat and scratches. Available in a variety of shades and patterns.
- Quartz Countertops: Engineered to be non-porous and resistant to staining, quartz offers a wide range of colors and patterns. It’s low-maintenance and long-lasting.
- Chantilly Granite Countertops: This premium granite is a luxurious choice, perfect for upscale designs. Its rich hues and timeless appearance add sophistication to any space.
- Bathroom Countertops: Opt for materials like quartz or granite, which resist moisture, mold, and mildew. These options are both practical and stylish for bathroom environments.
Why Accurate Measurements Matter
Precise measurements ensure that your countertops fit perfectly and save you from wasting time, money, or materials. Here’s why they’re essential:
- Cost efficiency: Accurate measurements reduce the risk of over-ordering or under-ordering materials.
- Fit and finish: A well-measured countertop ensures the right fit, reducing the likelihood of gaps or awkward seams.
- Smooth installation: Accurate measurements help professionals achieve a seamless installation without costly adjustments.
Partner with Esos Surface Company
When you’re ready to take the next step, trust Esos Surfacefor high-quality countertops and expert installation. Whether you’re interested in marble, quartz, porcelain, or granite, Esos offers an array of top-tier materials that can bring your design vision to life. Our professionals are ready to guide you every step of the way—from measurements to installation.
Start your project today and transform your kitchen or bathroom with the perfect countertop from Esos Surface.